How To Log Into The New TWA Website And Manage Your Profiles
The TWA recently introduced its new website. This post is to provide instruction on how to log into the website as a user and then update the User ID profile and the membership profile.
If you are reading this you obviously found the website and were able to get to this blog post. From here, if you have not already logged into the website using your User ID, you will need to do so in order to update your user profile and update your membership profile (if you are the administrator for a member account).
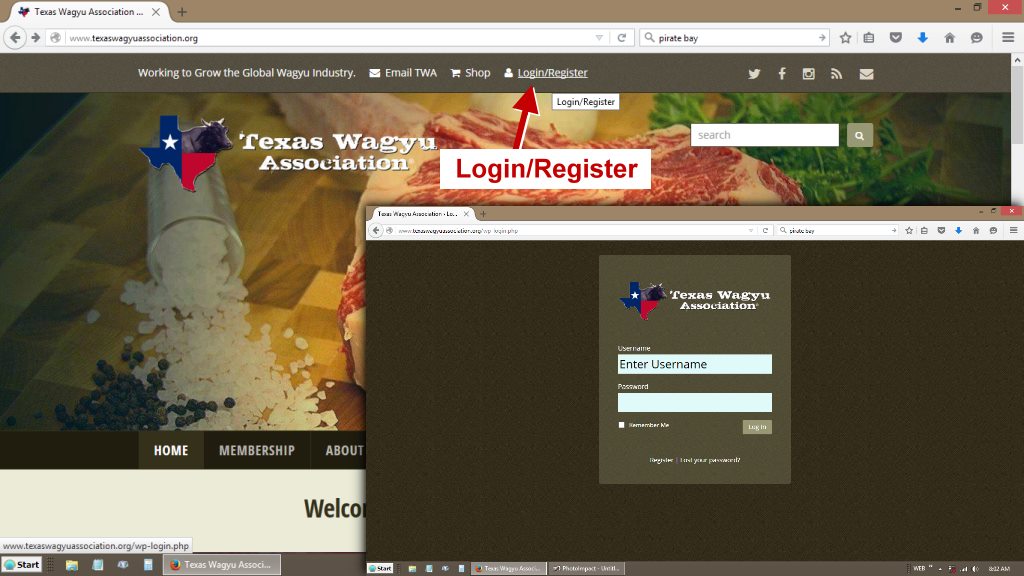
To log into the website, choose “Login/Register” at the top center of the website. If you know your User ID and password, enter them on the next page in the “pop-out” login window/box. If you are like most existing TWA members visiting and logging into the new TWA website for the first time, it is likely that you do not know the temporary password that the system set up for you when creating the User ID database. In order to obtain your User ID and related password reset instructions you must know the email address that is associated with your User ID. That would be the email address you had on file with the TWA. Enter that email address in the prompt and your User ID and password reset instructions will be sent to you via email. Follow the instructions in the email to log in.
Remember, a “user” is not a “member”. They are two different things in the website. A “user” is a person, while a member might be a person or an organization. Multiple “user” people may be associated with a “member”.
A “User ID” is usually a person’s first initial and last name (if the system created the User ID). For instance, for a user named “John Doe” that existed in the membership directory prior to the new website, the system would have created a User ID of “JDoe”. The User ID is not “case sensitive” so you can type in either upper or lower case. If you are registering as a new user you can create any User ID you wish so long as it has not already been used by someone else.
Each User ID is associated with an email address. The system will not allow two different users to utilize the same email address, because the email address is the mechanism by which a user is able to reset their password. If two or more users utilized the same email address, the system would be confused. Therefore, remember: An email address cannot be associated with more than one User ID.
To edit an existing “User ID” profile, after logging in, “hover” the mouse cursor over the “Howdy, Jdoe” text in the upper right-hand corner of the website main page. Then choose from the “drop-down menu” the option “Edit My Profile”. An edit screen will be displayed and the user can edit their personal information on the screen and then save the updates. To save the information added, click on the “Update” button at the bottom of the edit page.
Remember, a “member” is not a “user”. A member can be a person, a family, a corporation, a partnership, and each member is categorized as either a “Full Producer Member (a Wagyu Producer)” or an “Association Member (Wagyu Consumer/Seller)”.
In order to edit and update a “member” profile, the user that has the power to administer the member (usually the User ID that set up the membership) must look up the member record by inquiring/viewing members. The system knows that the administrator User ID has the power to edit the member profile and will show the user an “Edit” and “Delete” button at the bottom of the member profile page when the member record is viewed by the member administrator user. The user can choose to edit by clicking on the “Edit” button at the bottom and then enter member profile data. The member data is organized on two pages. The first page includes basic text information about the member. The second page allows for uploading pictures that will be displayed on the member’s profile page. A member that is an organization might consider uploading an image of their logo and setting that logo image as the “default directory listing image”, as it will then be displayed beside the member name in the membership directory. Images of the ranch, cattle, beef products, people associated with the member, etc. can also be uploaded and will be displayed when someone looks at the member’s detailed page. One thing to be aware of is that the system will only accept images/pictures of 1 megabyte or smaller. This is because large size images take a lot of bandwidth and make the website run slowly. That means if you have nice high resolution pictures you will need to use a photo editing software to “resize” them to make them less than 1 megabyte. If your picture is 2 megabytes you will need to use the “percentage resize” available in most photo editing software to reduce the picture size by 50%. Also, note that the website will “crop” pictures to make them square. Therefore, if your photo is in landscape (wider than tall) the left and right hand sides will be removed and if it is “portrait” (taller than wide) the top and bottom will be removed to make the picture square,. So make sure to use a photo editing software to crop the picture and make it roughly square before uploading. At the bottom of each of the two pages involved in “member profile” editing the user must click on the “Continue” button to save what has been entered on the page.
Hope this helps!